Step by Step Cataract Surgery Videos
Clean and Drape
Common Problems and Solutions
General:
1. Tremor
Tremor is very common and can affect all surgeons at some time. If you are nervous, then you are more likely to suffer. There is no easy solution. The basics are to be sure of your sitting position, make sure you are comfortable with the position of the patient, the microscope and the footpedals. Push your shoulders downwards and pull your elbows in towards your sides. Take a few deep even breaths in and out. If mid technique, then remove the instruments from the eye and wait for the tremor to subside. Occasionally you may have to miss out that case. Do not be despondent as your tremor will resolve as your confidence increases. Increase your confidence away from the patients by using your spare time to get into theatre and do the practice drills with the microscope. If annoyingly persistent then take a B Blocker to build your confidence.
2. Poor view
Take your time to set up the patient, the microscope and the footpedals. There is no excuse for not knowing how to center and focus the microscope. Check the microscope bulbs are all working and are all set to perfect illumination. If your view is inadequate, stop and do not continue until the problem is resolved.
3. Poor red reflex
Every microscope has a different system for generating the red reflex. Make sure you know how your microscope works. If the pupil is poorly dilated use hooks. If the lens is too dense use vision blue.
4. Poor access
Some deep set eyes can only be accessed temporally. If you are used to operating from the top the idea of swapping to the side may seem daunting. There is less change than you may think. Make sure you swing the chair, microscope and foot pedals through a full 90 degrees. Be as comfortable as you can before starting. There is no forehead to rest your hands on, instead the technique is to splint your ring and little finger against the patient's temple. You may need your assistant to provide counter pressure on the other side of the patient's head.
5. Chasing an out of control situation
Prior to a complication there are usually some common factors. The surgeon is uncomfortable, the view is deteriorating, the microscope is not centered, the tissues or instruments are not behaving as anticipated. When this happens, stop what you are doing, take the instruments out of the eye and regroup. The natural tendency is to chase a situation to try to bring it back under control. This does not work with microsurgery. Very little can go wrong when there are no instruments in the eye. It is always better to stop, reposition the patient, microscope, footpedals and instruments and then regain control from that position of advantage.
Common Problems Draping:
1. Lashes in field
Redrape. Ensure the cleaned skin is dry and adequate eversion of the upper lid is possible. Tucking spilled lashes back in almost never works and increases your risk of endophthalmitis.
2. Blepharospasm
Some patients, especially with topical anaesthesia cannot allow the draping through uncontrolled blepharospasm. A useful technique is to double clip with two lid speculae. The first lid speculum is placed to evert the lids, the drape is applied, and the second speculum placed over the first.
Mainport
Common Problems Ports:
1. Leaking
If the port is too short it will leak. If making the wound edges oedematous does not stop the leak you will need to place a suture. Be sure to remove the suture at 4 weeks. Delay the post op refraction to six weeks.
2. Too long
Too long a port is safe but makes all the rest of the surgery and in particular the capsulorrhexis challenging. If way too long it may be better to ignore that port and make another. If your ports are consistently the wrong length, go back to practising your keratome insertion into the silicone conformers, until you have improved your feel for the wound length based on your angle of entry.
3. Conjunctival trauma opposite port
When you are concentrating on the keratome, it is easy to miss the fact that your grip on the opposite conjunctiva is causing a subconjunctival haemorrhage. Try to avoid this by either not gripping the conj at all and just using counter pressure, or by very carefully and deliberately gripping at the limbus. The Thorton Fine ring is an expensive but effective solution. If you distort the wound on your first port the eye will be too soft to create the second port. In which case fill with viscoelastic prior to creating your second port.
4. Capsular incision with tip of keratome
This can be done deliberately to initiate your capsulorrhexis. If not deliberate, be more aware of your angle of corneal penetration. Practise making your port in slow motion. Be aware of the point at which the penetrating pressure suddenly eases and the keratome enters the eye more rapidly.
5. Iris prolapse
Tamsulosin has made iris prolapse possible even with perfect ports. More commonly your wound is too short, and there has been too much local anaesthetic injected to give a pressure on the globe. Any iris trauma can give a prolapsing strand. Avoid iris trauma by using viscoelastic to protect the iris when inserting the phaco tip in a semi dilated eye. Do not try to replace the prolapsed iris until the end of the procedure. It will usually prolapse again and each attempt to replace it causes more trauma. If the iris cannot be reposited the first step is to suture the wound and retry. Consistent prolapse needs to be excised.
Viscoelastic
Sideport
Capsulorrhexis
Common Problems Capsulorrhexis:
1. Too small
The whole phaco will be difficult if the capsule is too small. If incomplete, spiral the capsule round again to enlarge. If complete use scissors to nick the edge and restart the enlargement from this point.
2. Going wide
Stop! Refill the anterior chamber with viscoelastic to flatten the surface of the lens. If the anterior chamber will not fill, consider a heavy viscoelastic. If using a needle swap to forceps. Grasp the edge of the capsule and pull backwards in the opposite direction to the shearing edge. The edge should return. If lost to the equator there are two options. The capsulorrhexis can be restarted in the opposite direction and taken to meet the lost edge. This can leave a radial split, and the risk of this split extending to the posterior capsule is significant. The remaining capsule can also be opened with a can opener style. In both situations the remaining phaco needs to be done with great finesse.
3. Poor view of capsular edge
Dim the room lights, increase the microscope magnification. Even at this stage consider vision blue.
Hydrodissect
Common Problems Hydrodissection:
1. Not effective, no wave
The usual cause is inadequate pressure on the hydrodissection syringe. Once the dissecting wave starts the pressure actually needs to be gently increased to sustain the wave across the posterior surface. Check the tip of the cannula is in the correct position just under the capsule edge. Resite the tip and try again. Always dissect until you see the wave and the lens is confirmed to be rotating.
2. Too effective, lens lifted out of capsule
This is a frustrating problem as it happens very quickly. Typically the semi prolapsed lens will not reinsert into the capsule, consequently the lens will not rotate and your usual phaco technique in ineffective. If possible use downward pressure to push the lens back into the bag. If ineffective use viscoelastic to lift the whole lens out of the bag where it will at least rotate on the anterior capsule. This is not always possible. Phaco a half in half out lens with extreme caution. Your aim is to remove the prolapsed part first such that the remaining half will drop back into the bag where it can be safely rotated and removed.
Insert Phaco
Rotate Phaco
Common Problems Phaco Insertion:
1. Descemets stripping (thankfully very rare!)
Insertion of the tip upside down with subsequent rotation in the anterior chamber allows insertion without the need for a second instrument to hold the lip of the corneal wound. The disadvantage is that the edge of the phaco can catch the descemets and peel it off the endothelium. Insert slowly if you use this technique and be aware of the possibility.
2. Iris snagging
Conversely if you prefer to insert the phaco the right way up with a second instrument lifting the lip of the port, the phaco tip can snag the iris of a semi dilated patient. Anticipate and avoid this by inserting a bead of viscoelastic to protect the iris.
Footpedal Control
Sculpt
Common Problems Sculpting:
1. Phaco pushing lens and not cutting
Increase the phaco power. If flat out on the footpedal increase your phaco power settings.
2. Phaco grabbing lens
You have occluded the tip. When sculpting aim for 75% occlusion to avoid engaging the vacuum.
3. No effect
Air phaco is very common when your first start operating and are very cautious. The phaco tip needs to engage with the tissue of the lens to have an effect.
Rotate
Common Problems Rotating:
1. Ineffective
Stop. Repeat the hydrodissection. Never try to increase your rotational force until you are sure the lens is free from the capsule. You can easily disinsert the zonules. Be extremely aware of pseudoexfoliation and anticipate weak zonules.
2. Lens and capsule moving
Repeat the hydrodissection.
3. Clear zonular dehiscence
Insert a capsule tensioning ring if less than 50%. Anticipate vitreous loss and a dropped nucleus.
Crack
Common Problems Cracking:
1. Will not crack
This is the most common difficulty of all. The cause is straightforward. The nucleus will not crack unless the trench is deeper than halfway, has parallel sides, and is wide enough to allow both cracking instruments all the way to the base. In most circumstances the trench is not deep enough and further phaco does not reach the bottom of the trench, as the upper layers are not wide enough to allow the sleeve of the phaco to pass. Avoid this problem by making the upper trench double width. This also gives you a better view and allows easier placement of the cracking instruments.
2. Poor view to bottom of trench
Make the upper trench double width.
3. Assymetric crack
This need not be a problem. Rotate the nucleus and continue with the smaller side first as this will be the easiest quadrant to lift.
4. Uncracked deep plate
The cracking process is slow. First the nucleus cracks, and then a second cracking force can be required to split a dense epinucleus. If the epinucleus remains uncracked the quadrants may not lift. Keep rotating and recracking as there is usually one quadrant that will split out. Use viscoelastic to lift the plate anteriorly off the capsule to allow it to be safely taken into the phase tip.
Chop
Common Problems Chopping:
1. Capsule trauma
Be very aware of the edge of the capsule with every placement of the chopper.
2. Zonular trauma
Never, never chop unless you are sure your chopper is within the capsulorrhexis or under the capsule if using a wider insertion technique.
3. Lens too soft
Why chop? Soft lenses can be removed almost totally with vacuum. The phaco power required is so small the benefit of chopping is lost.
Dropped Nucleus:
There are only 2 types of cataract surgeon. Those who have dropped a nucleus and those who will. At some point you will experience a capsular tear that extends posteriorly and the nucleus will slide into the vitreous. If possible the nucleus can be caught and lifted into the anterior chamber and removed with the phaco. It is not safe however to apply the phaco to the vitreous as if the tip occludes with vitreous the vacuum will effectively pull the vitreous and potentially the retina into the phaco tip.
A dropped nucleus is therefore best dealt with by a vitreoretinal surgeon and full vitrectomy. Stop the procedure, explain to the patient what has happened and that they will need additional surgery to remove the cataract. Call your VR surgeon immediately and do not let the patient leave until you have arranged their next operation.
With a healthy cornea and retina we can place a new lens in the anterior chamber, or use an Artisan iris claw lens. The patient should still get a good result.
Remove Quadrants
Common Problems Removing quadrants:
1. Quadrant will not lift out of section
The quadrant needs to be fully cracked and freely rotating to lift. Sometimes the first quadrant has an epinuclear plate attached that tucks under the remaining quadrants. In this situation simply rotate and lift one of the other quadrants first. To apply the vacuum to the quadrant the phaco tip needs to be fully occluded. In dense nuclei, a little phaco power is required to embed the tip first.
2. Quadrant bounces off the phaco tip repeatedly
Dense nuclei can be difficult to hold onto the phaco tip. Consider changing to pulsed phaco. Use the second instrument to push the quadrant to the tip.
Irrigation and Aspiration
Irrigation and Aspiration:
1. Poor view of sub-port soft lens matter
Swap to bimanual. Insert the lens and dial to use the haptic to loosen the soft lens matter in this area before retrying removal.
2. Catching of the capsule
Stop! Do not move, allow the tip to release the capsule before moving. If the tip will not release ask your scrub nurse to milk the tubing back toward the aspirating handpiece.
3. Zonular tear
If no vitreous loss insert a capsule tensioning ring if less than 50%. If vitreous loss proceed to anterior vitrectomy.
5. Vitreous loss
Anterior vitrectomy. A good clean up of the vitreous is essential. If the anterior capsule is intact the lens can be sulcus fixed. If no capsule an anterior chamber IOL is required. Do not forget to create the peripheral iridotomies to prevent glaucoma. Use miochol and be sure there is no vitreous to the wound.
Polish the Capsule
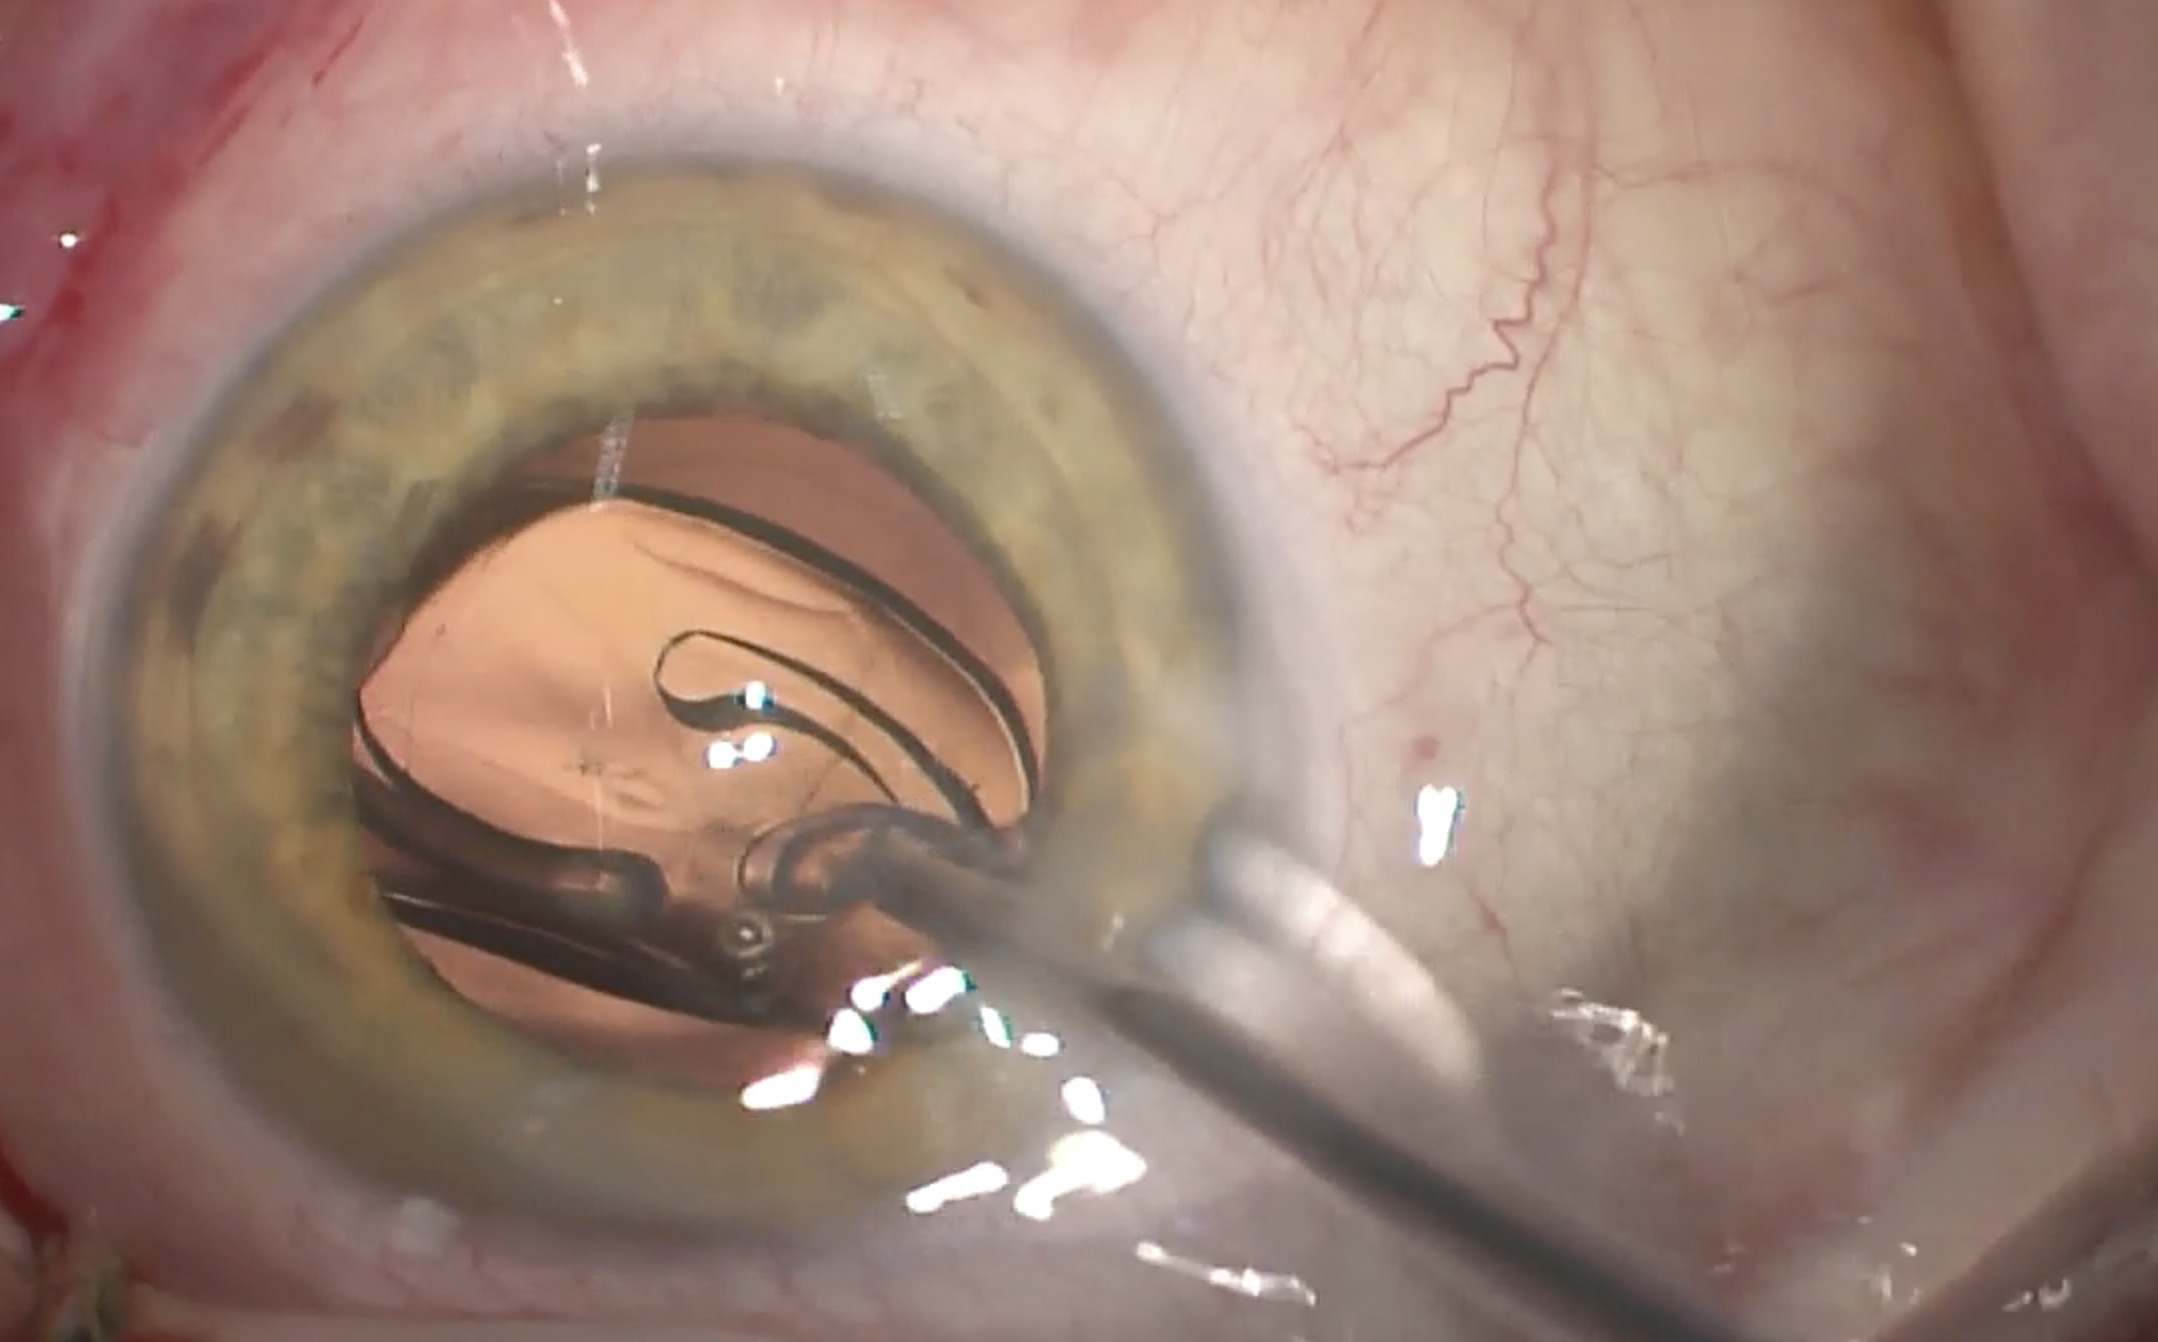
Inject the Lens
Common Problems Lens insertion:
1. Wound too tight
Do not try to force the injector, if it will not easily enter the wound it is safer to enlarge the wound. This is now very rare with the specific keratoses and injection tubes matching.
2. Not in the bag
Many modern one piece lenses can be placed into the bag simply with some downward pressure on the optic. If two piece it may be necessary to dial the haptic into the bag. This technique requires refilling the bag and anterior chamber with viscoelastic and then rotating the lens until the first trailing haptic is under the main port. A downward and rotational push with the lens dialer placed at the junction of the optic and haptic will at this point place the haptic into the bag. Continue the rotation and repeat with the second haptic.